Creating a Chatbot on Android Using Unity3d and RASA
Introduction
How am I here?
Back on early 2020 I was learning Unity3d from its premium subscription and I was suddenly more interested on it. Also while I was doing internship, I learned how to make a commercial chatbots using RASA and deploy it on various platforms. Then I also got interested on text based game where there will be multiple choices and different stories that a player can have. I have not completed(but doing some) any Unity projects yet but I am sharing something useful here and I surely will use these concepts later on real world applications.
What will this blog be?
This blog will be a gentle introduction to the Unity3d and RASA to make chatbot. Or importantly, deploying a simple RASA chatbot on Android using Unity. I will also give gentle introduction to building Android installation(APK file). Importantly, I am not going to make next Alexa or Siri here. If you are here, then you probably know that Unity is a popular Game Development Platform. And Unity3d is C# based and I heard JavaScript can also be used. Unity3d has very great functionalities and the dev community so learning it will be easier than you think. If you are the one who wanted to learn game development for free but doesn't know where? Then you can follow my below blog for guidance. I am not a pro here but a learner who shares what learns.
What will I built?
I will test the RASA chatbot framework with Unity's powerful Game Development platform. I will be using Unity's Networking concept on C#, I will only send a single message and then show the sent and received message on a Canvas. The testing will be done on Android Device, but first I will test it on Unity Remote. Unity Remote is a wonderful application available for Android Device, where we can test our developing aplications on UnityEditor.
Preparing System
My system is Intel I5 with 8GB RAM and Nvidia Geforce 720M, 250GB SSD. It will be very painful to run Unity on low specifications so the proper hardware is essential for this.
Preparing RASA
I am using:-
I am using old version of RASA because it is more stable and this current blog doesn't requires much functionalities. If I have to write on steps then below steps will be best idea to prepare RASA.
- Install Python from Anaconda.org
- Install Virtual Environment usng
venv(Read Here Creation of Virtual Environments - Activate the environment (Please follow the steps stated on above link to activate it)
- Install the RASA using
pip install rasa==1.3.3if error persists, follow the official installing steps. - Install Spacy
- And install any other required libraries.
Training RASA
RASA is understood by the system because it is added to system variables. So preparing a RASA project is very simple. From command, go to your working directory and there, rasa init. Then follow the command line steps it tells to do. Finally it will ask if we want to talk to our Assistant, then click yes and we are good to go. RASA creates a project folder on our directory and it includes everything we need on files. It uses some sort of LSTM networks to train a network model.
The files structures created by rasa is:-
- main dir
- data
- nlu.md
- stories.md
- models
- .....tar.gz
- init.py
- actions.py
- config.yml
- credentials.yml
- domain.yml
- endpoints.yml
- data
Currently, we don't need to understand any of these so I am heading towards next step.
Start RASA server
Starting a RASA server is essential for us because we will be sending a request from Unity's event. So the only way to make listen our message is by webhooks/api.
- Activate environment
- From activated environment command window, go inside RASA project directory
- Type and hit hit enter after the command
rasa run - Done
The rasa server will be running on localhost:5005 we can change this but for now leave it as it is.
Preparing Unity3d
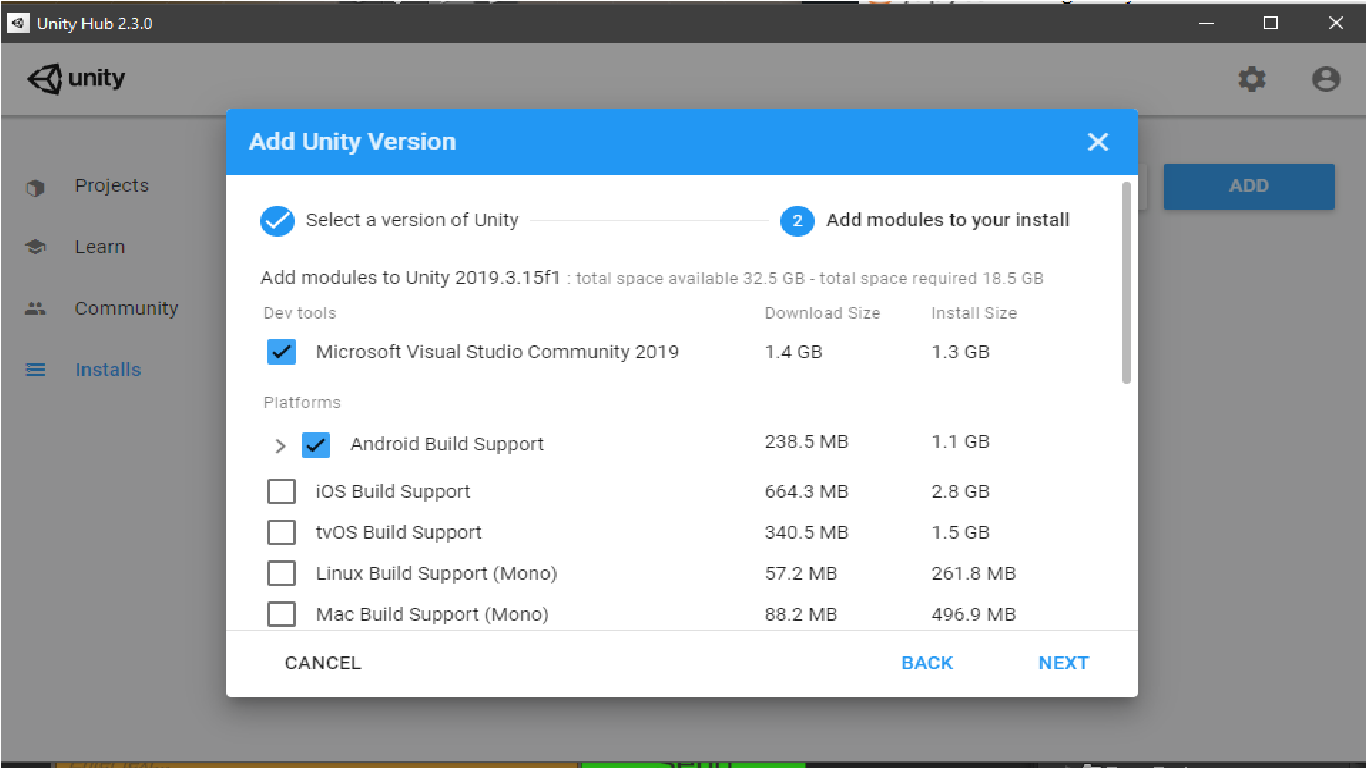
Please download UnityHub from its official website. Then it will allow us to add UnityEditor by adding, I am suggesting Unity 2018.3.17f1 to download. While installing Unity, please don't forget to click on checkboxes like below. Installing MS Visual Studio is very helpful which is by default checked.
Create a Unity Project
For simplicity, just create project with default settings but make sure where is your unity project is. Also give your project a good name.
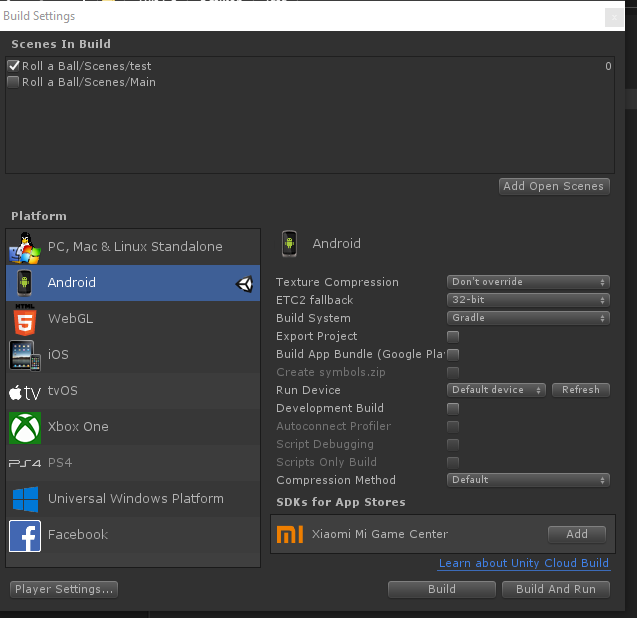
Setting Build Settings
When opened the Unity window,
- Go to File
- Go to Build Settings
- Click on the Android icon, it will take some time to change the settings to another platform. If you can't then install android support manually.
-
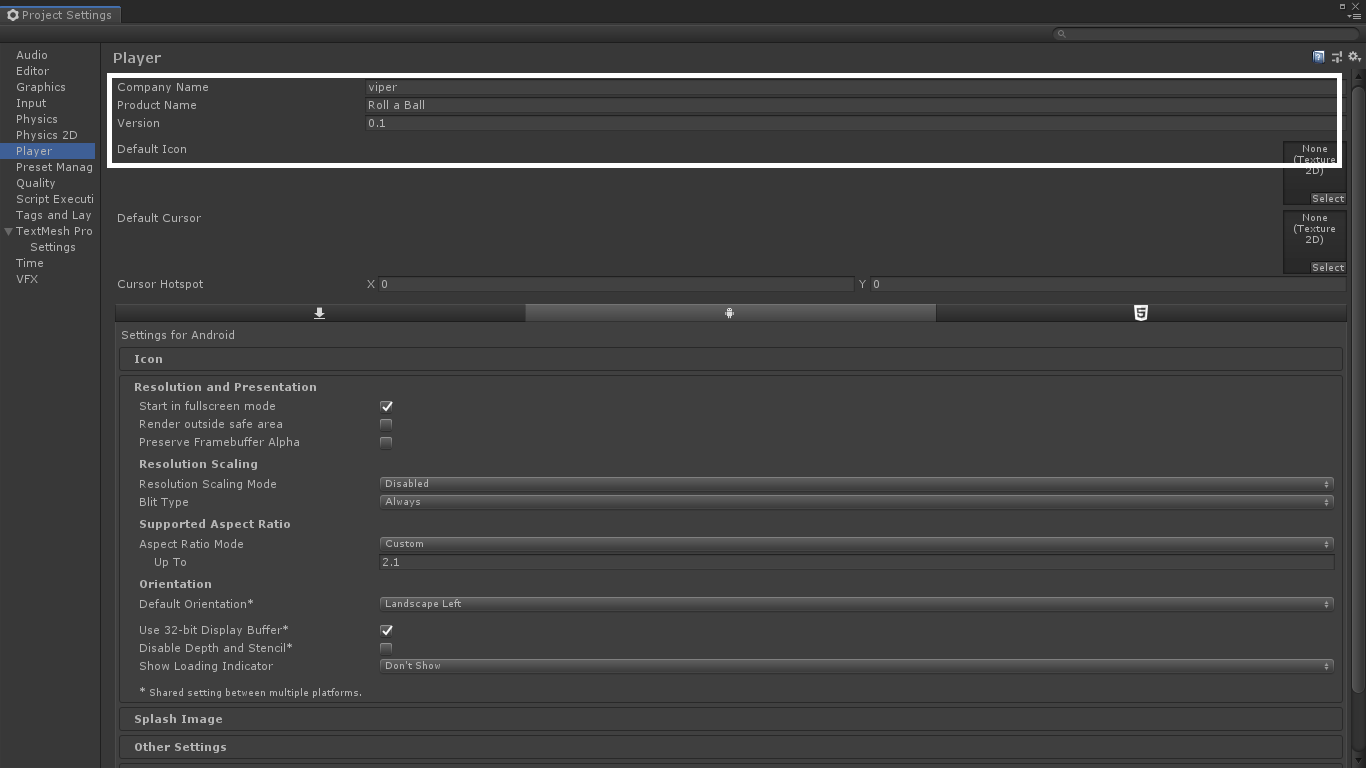
Also go to Player Settings and name your project, comany, version. Player Settings is available under

-
Also add identifications
-
Switch to 2d Mode by clicking on 2D

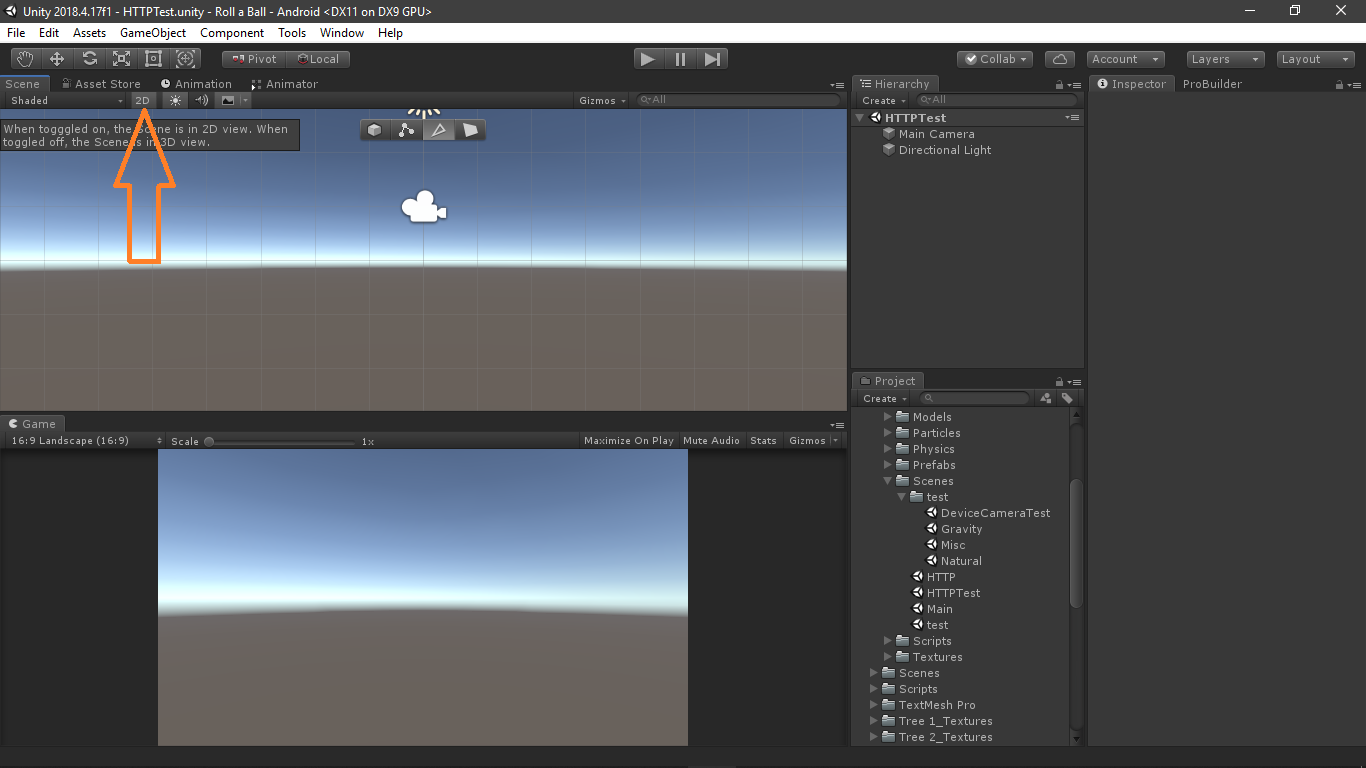
The window and project structure I have is new, but I am writing this blog on existing project on new scene. So only focus you should make is on the things I stated. This Unity project I am working is a game named Roll a Ball which is still being developed. Also I am working on new Scene named as HTTPTest. SO you have to edit your Scene to HTTPTest from Main.
Creating Simple GUI on Unity
Now we will create a GUI where we will do all UI works.
Create a Canvas
- Right click on Hierarchy
- Go to UI
- Go to Canvas
Installing TextMeshPro GUI
If you happend not to have TMP GUI, then it is essential for us.
- Go to Windows on Unity's Tabs
- Go to Package Manager
- Look for TextMesh Pro
- If not there, make sure you are online
- Then click on install and import it
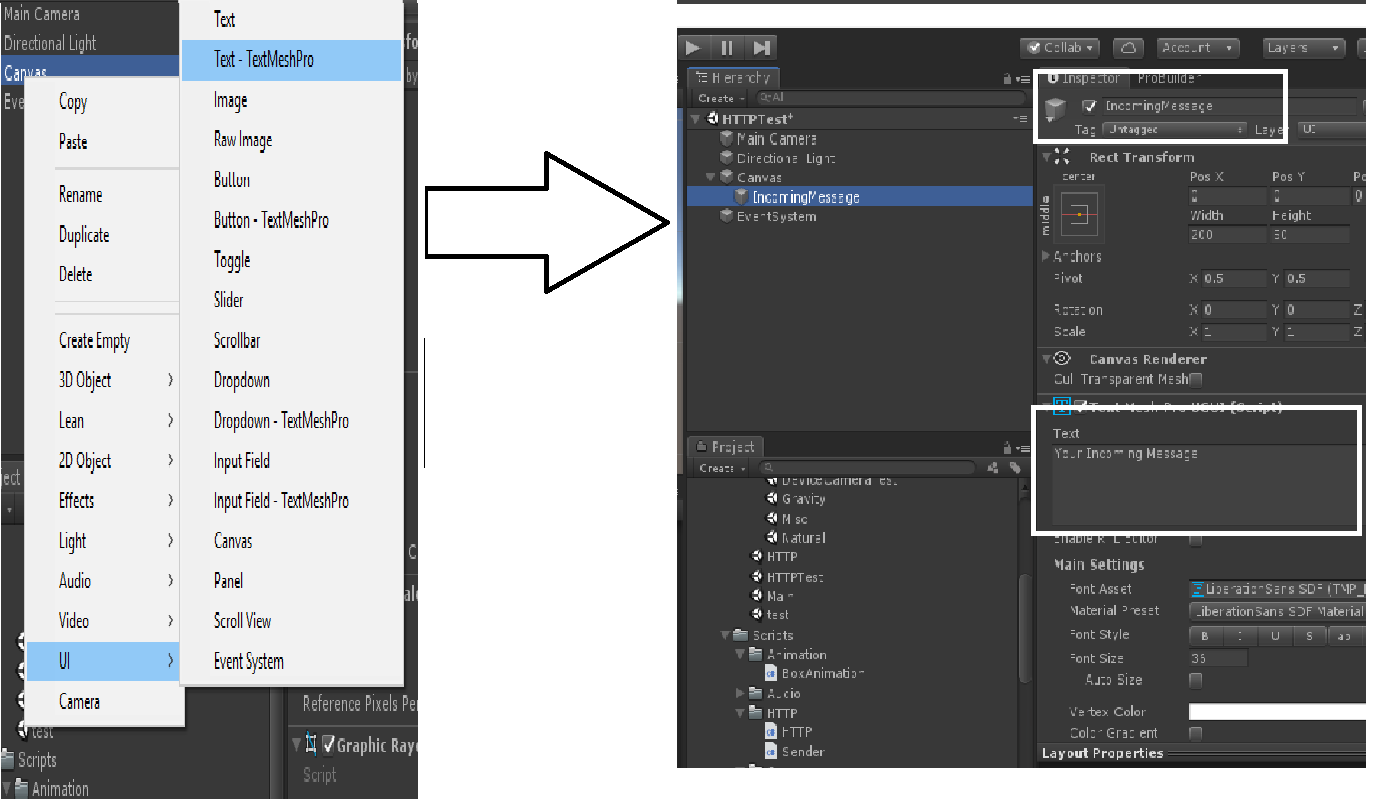
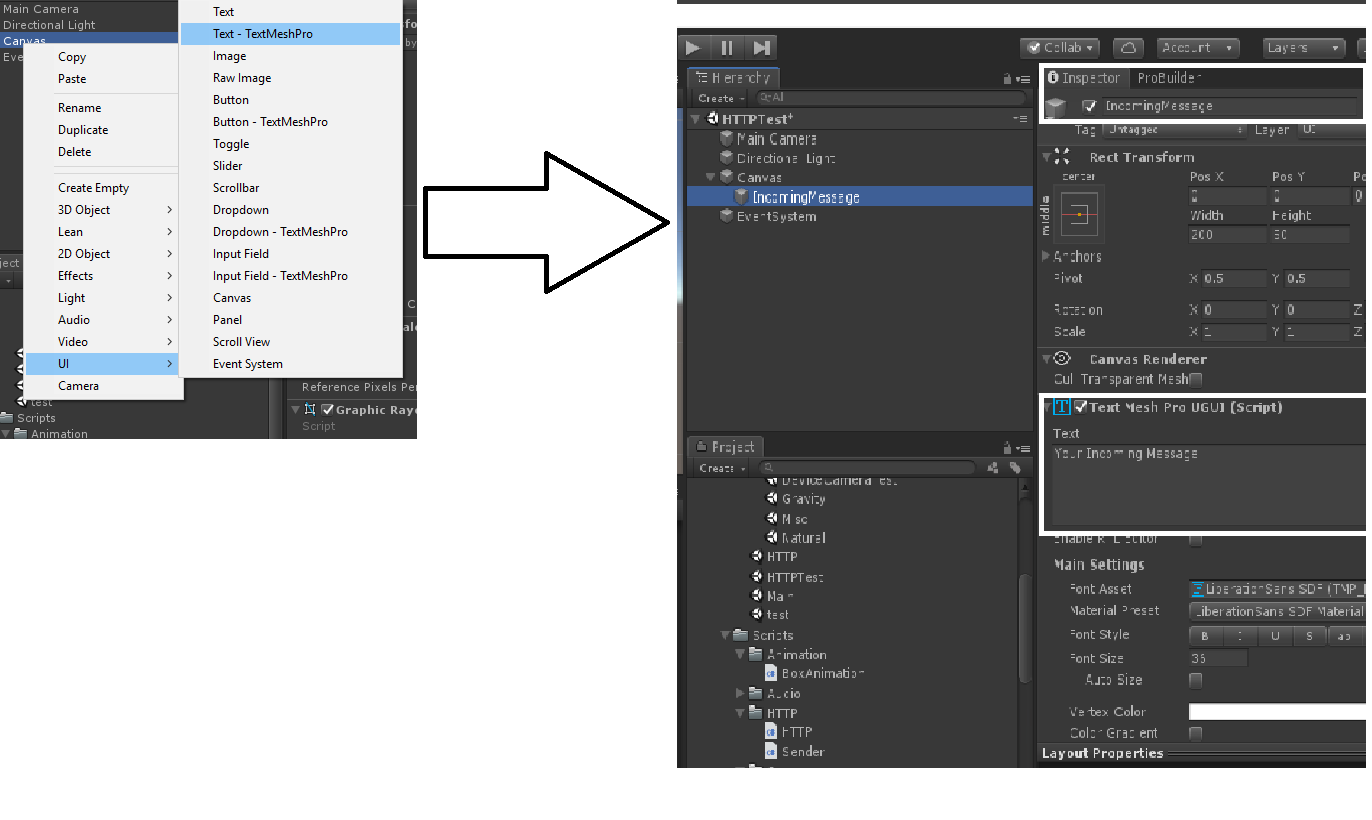
Add Textbox for Incoming message field
- Right click on Hierarchy
- Go to UI
- And click on Text-TextMeshPro
- Rename it to
IncommingMessage - On Inspector side of this TMP(Text Mesh Pro), edit its text to
Your Incoming Message.
Add Textbox fo Outgoing Message field
Follow above step or just duplicate (CTRL + d) above Game object and edit it.
EventSytem
If your hierarchy doesn't contains a event system then the GUI wont function properly. So insert one from right click-> UI -> Event System.
Add Send Button
Again we will use TexMesh Pro.
- From UI, just like above, add Button- TextMesh Pro
- Name it Sender Button
- expand it and on it lies, Text, on its TextMeshPro UGUI field, type
Send. Then the text on button will change.
Scripting Unity
We will be using C# for writing codes here. We will use the concept of Networking on Unity, which is available by default fron Unity engine. I am using Visual Studio, which makes debugging so easy. I am not going to do tutorial on C# or any other scripting on Unity but my sole focus is to combine Unity and RASA to work full function.
Right under your Project Folder name on Project Window, there might be a folder named Scripts. If not present there then add on manually by right click->create->folder. And name it as Scripts. Following a Naming Convention makes Unity Learning much easier. And under Script folder create a new folder named HTTPTest. Where we will create our script files. There on HTTPTest folder, create a new Script file name HTTPTest from create menu.
Then select all our GUI Objects under Canvas. Click on HTTPTest script and drag that and drop that file on the bottom of inspector. Then ther must be the script available under inspector panel.
Coding Part
Open the HTTPTest.cs script file and lets start coding it. Initially there will be scripts but lets clear them all.
using System.Collections;
using UnityEngine;
using UnityEngine.Networking;
using TMPro;
using System;
using Newtonsoft.Json;- Collections is used to work with generic datatypes.
- UnityEngine is used for MonoBehaviour
- Networking to handle web requests
- TMPro to work with TextMeshPro
- Newtonsoft.Json for handeling JSON text.
Newtonsoft.Json
I am using Newtonsoft.Json a free opensource framework to work on JSON on Unity/C#. I am recommending you to install it. It is publicly and freely available on Unity Asset Store. Or you can download the file and then import to project. But installing and importing from Asset Store is much more efficent and easy choice.
Create a HTTPTest Class
By default when creating a Script, Unity makes a class for us but we cleared all earlier. so the class will include Start() and Update() method. Start is called once before first frame update and update is run on every frame.
public class HTTPTest : MonoBehaviour
{
    private string text;
    public TextMeshProUGUI displayIncomingText;
    public TextMeshProUGUI inputField;
    public TextMeshProUGUI displayOutgoingText;
    void Start()
    {
        displayIncomingText = GetComponent<TextMeshProUGUI>();
        inputField = GetComponent<TextMeshProUGUI>();
        displayOutgoingText = GetComponent<TextMeshProUGUI>();
        Debug.Log(displayIncomingText.text);
    }
}textis used within a class just to hold text data or we hold what HTTP request returns.displayIncomingTextto hold what our RASA model returns.inputFieldto hold where we will type our message.displayOutgoingTextwhere we show our outgoiong text.
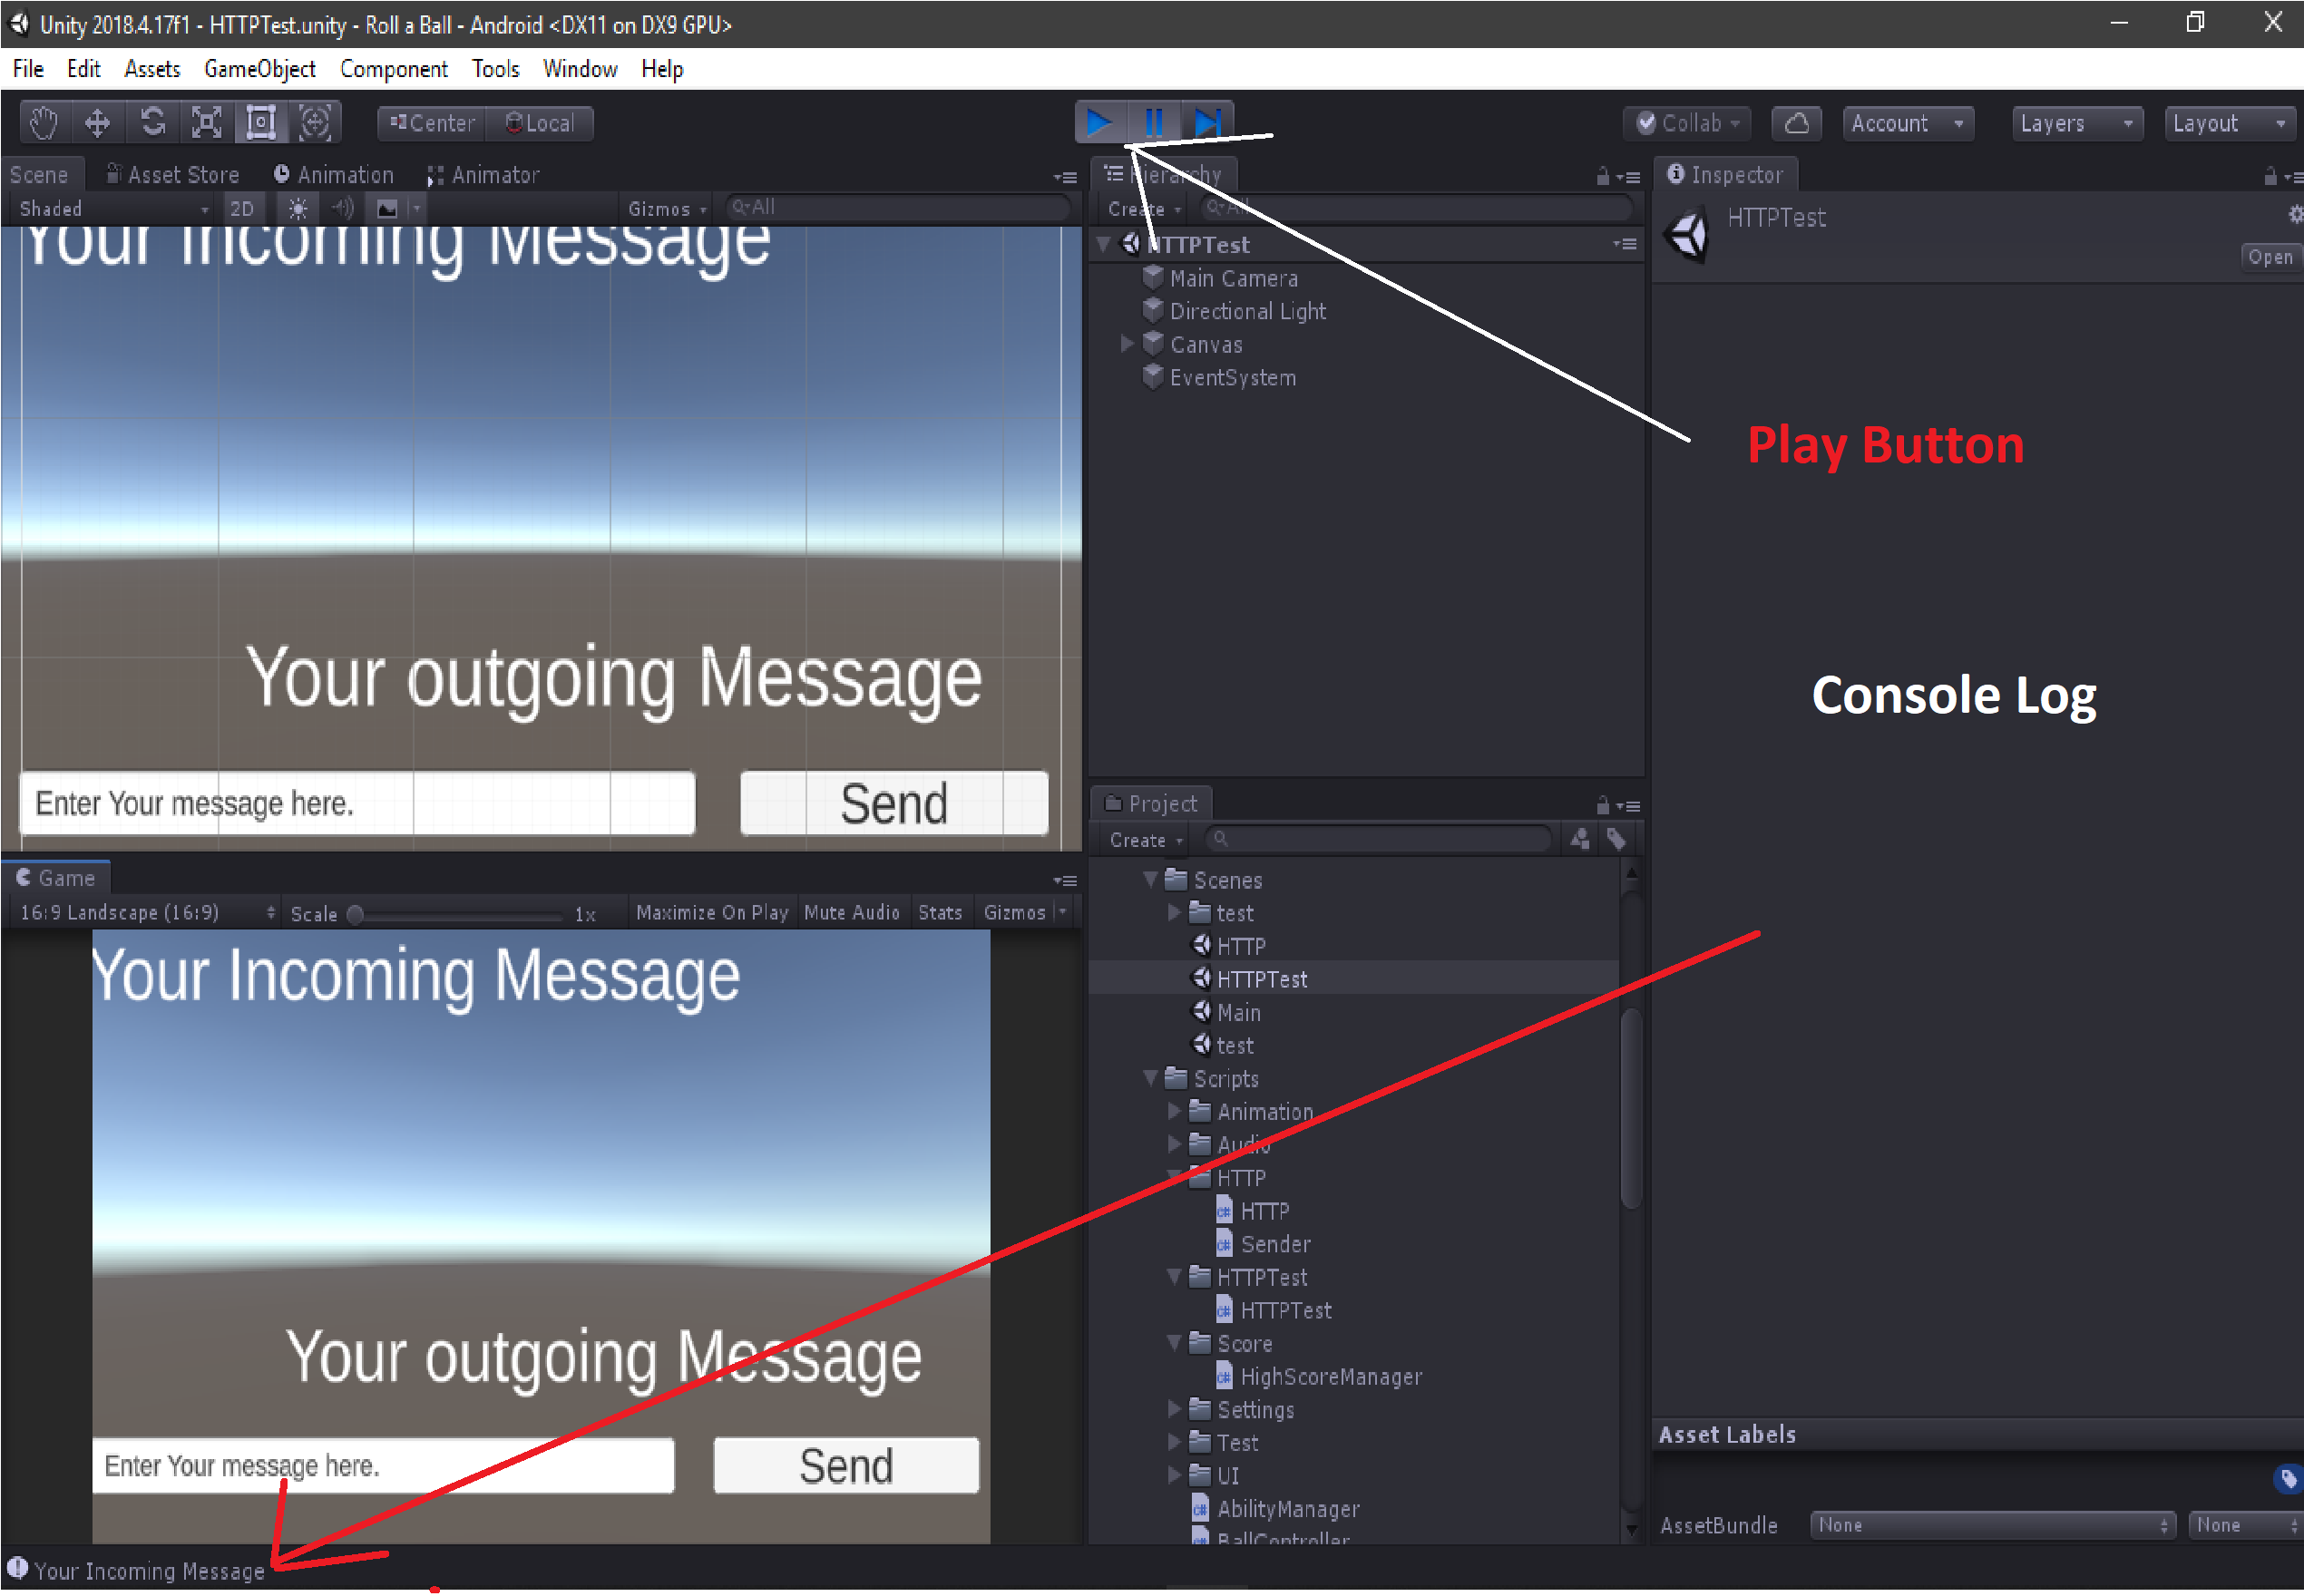
Save the script and go to Unity editor and press the play button. On the Console log, there must be seen text Your Incoming Message.
Create Class for Message Handeling
[Serializable]
public class MessageSender
{
    public string sender, message;
}
public class Message
{
    public string recipient_id, text, image;
}
MessageSender
It is made serializable because we can later make it like JSON formatable.
senderis used to hold string sender, generally it will be usernamemessageis used to hold string message sent by sender
Message
This class will handle incoming message sent by RASA channel.
Posting a Web Request
Note that the format of post must match with what a RASA webhook expects to be. Its format is available on RASA's website but for simplification I am using below approach.
{sender:sender_id, message: message text}
public void CallPostRequest(string txt)
    {
        MessageSender thisMSG = new MessageSender();
        thisMSG.sender = "Rasa";
        // read from the input field here.
        thisMSG.message = inputField.text;
        displayOutgoingText.text = inputField.text;
        string json = JsonUtility.ToJson(thisMSG);
        string a = "http://localhost:5005/webhooks/rest/webhook";
        StartCoroutine(PostRequest(a, json));
    }
This method will be called when a user hits a send button. What happens here?
- Create a new instance for Message Sender,
- Set
sendertoRasa. (just for simplification) - Set
messageto text present on input field's text. - Set display text i.e. outgoing message field.
- Convert
thisMSG's attributes to JSON. - Start a thread or Coroutine named
PostRequestthat takes address of webhook and the JSON string.
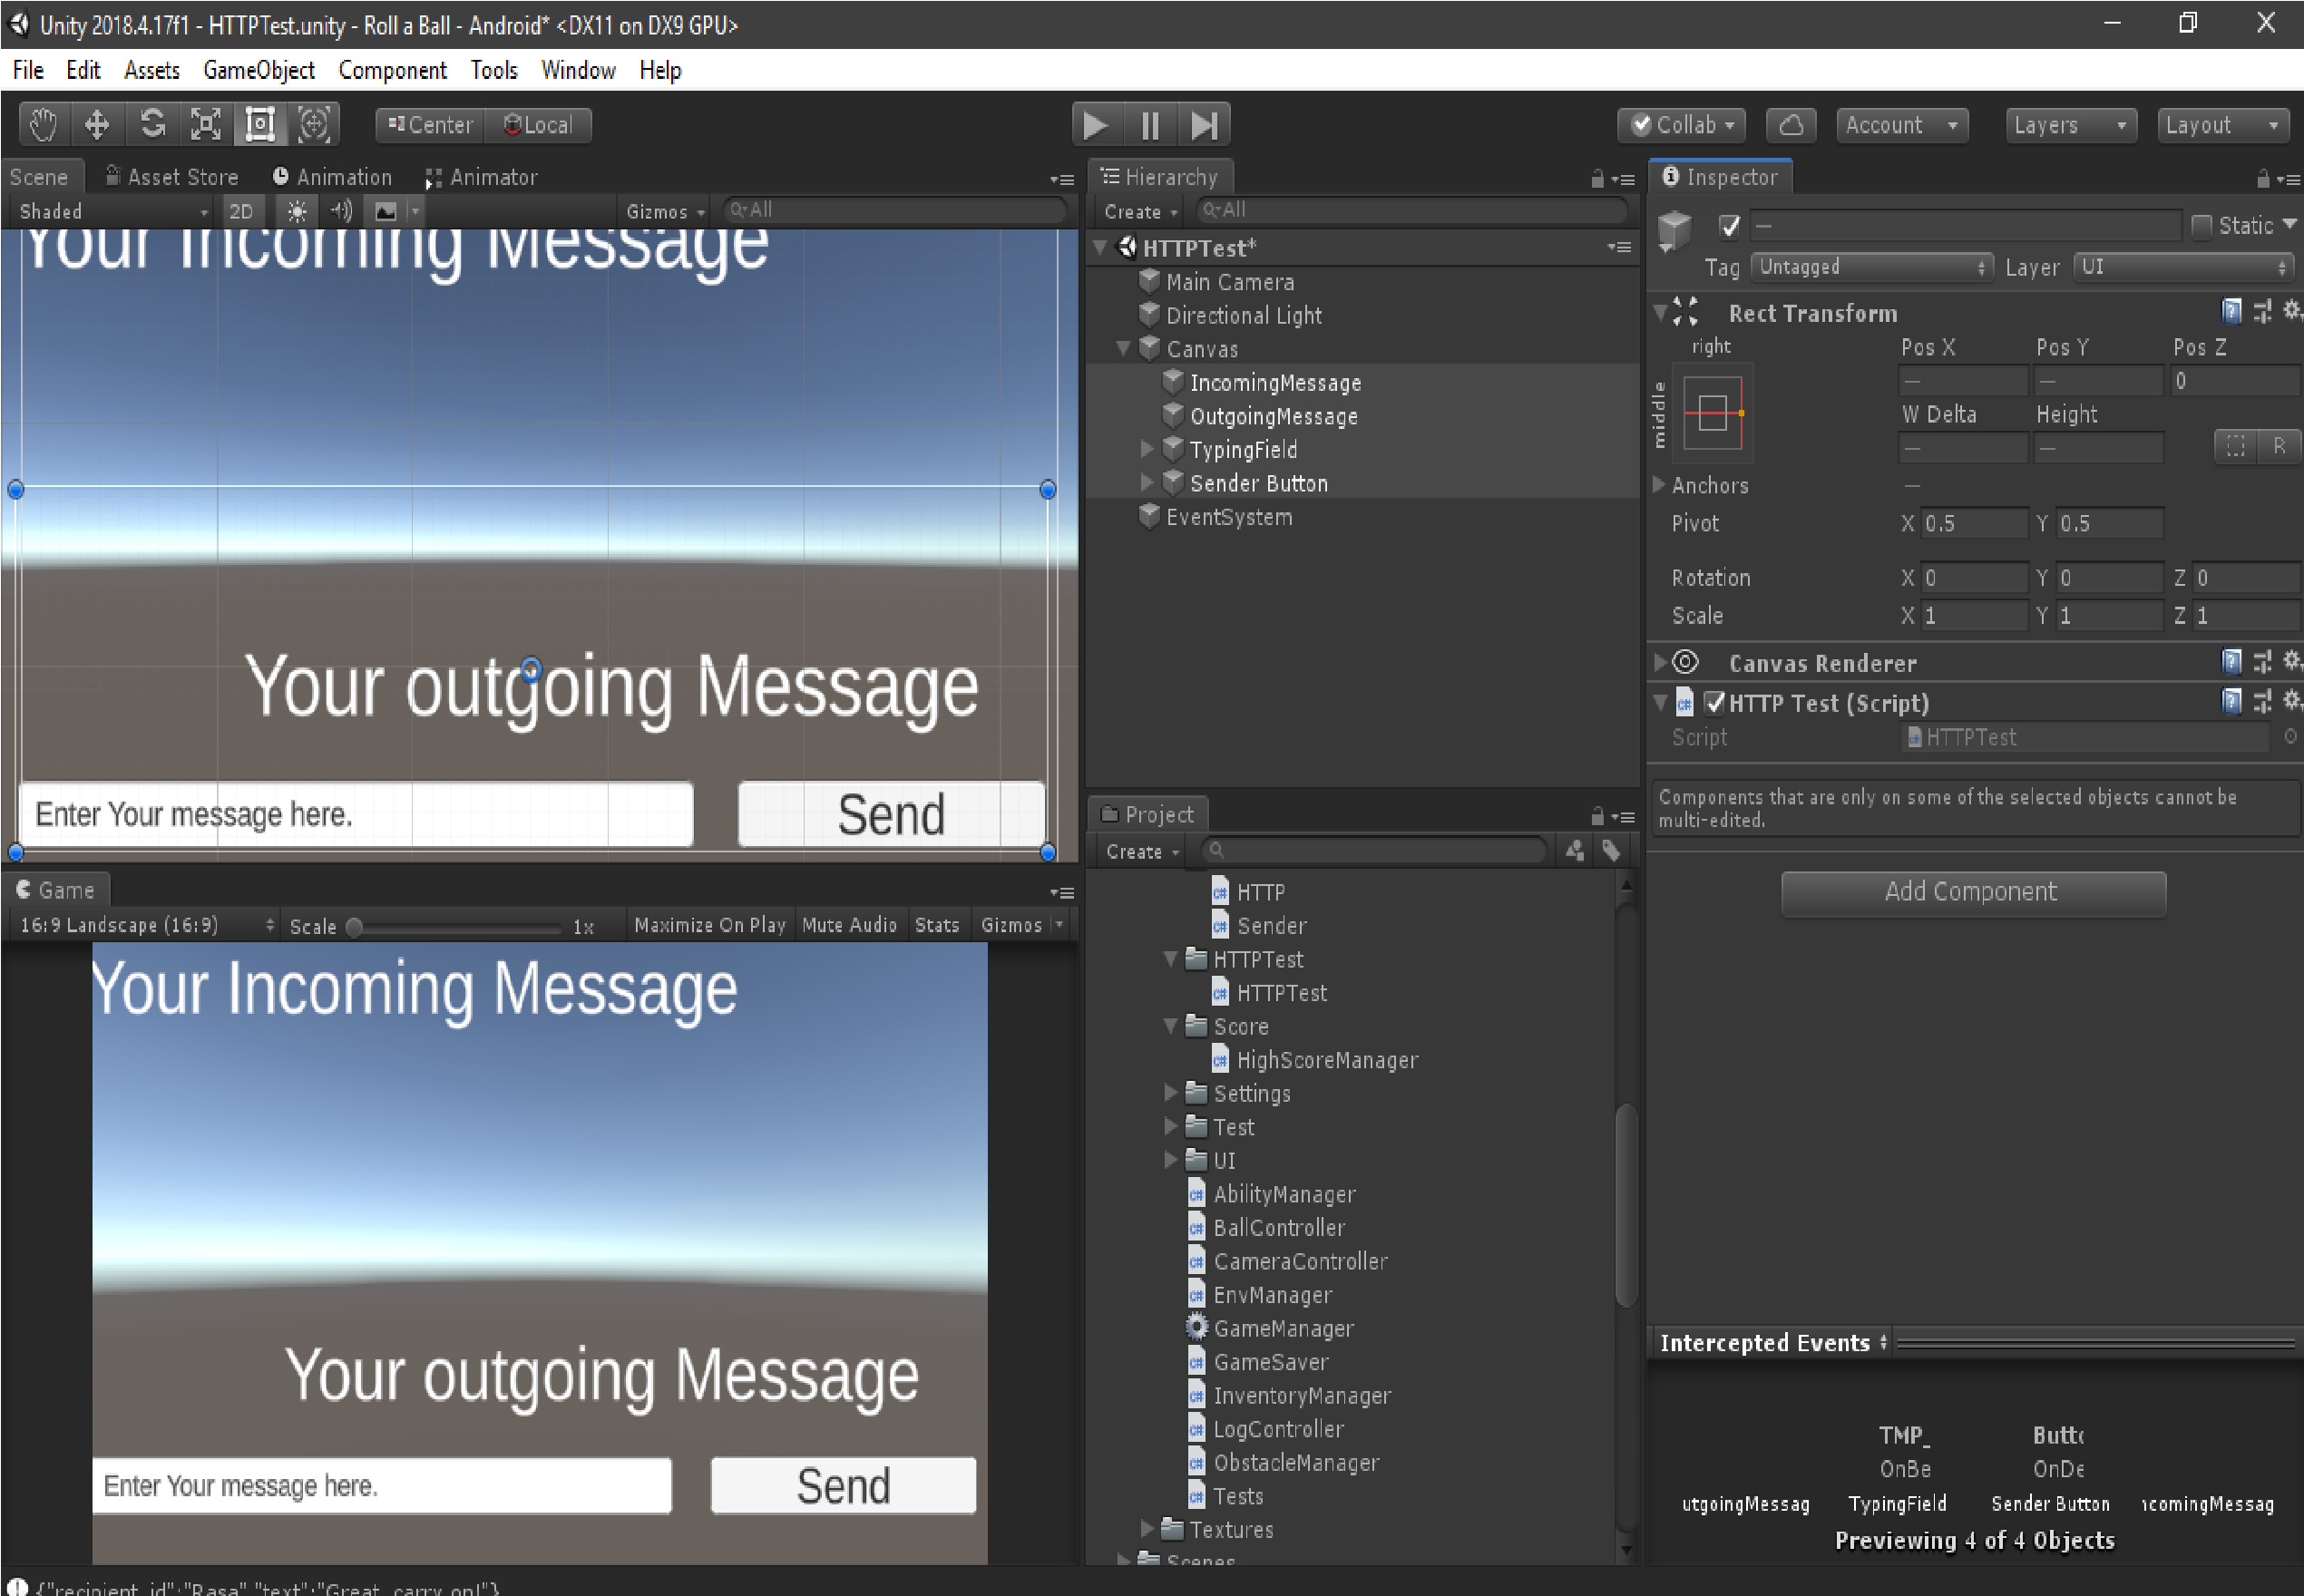
Go to Unity editor and on the Button(Script) section of inspector. We will add event on button. Click on + sign and drag and drop IncomingMessage object on it. On the little bit right, add function under class HTTPTest, named CallPostRequest.

Post Request and Handeling Responses
IEnumerator PostRequest(string uri, string json)
    {
        var uwr = new UnityWebRequest(uri, "POST");
        byte[] jsonTOSend = new System.Text.UTF8Encoding().GetBytes(json);
        uwr.uploadHandler = (UploadHandler)new UploadHandlerRaw(jsonTOSend);
        uwr.downloadHandler = (DownloadHandler)new DownloadHandlerBuffer();
        uwr.SetRequestHeader("Content-Type", "application/json");
        yield return uwr.SendWebRequest();
        if (uwr.isNetworkError)
        {
            text = "Error";
        }
        else
        {
            text = uwr.downloadHandler.text;
            Debug.Log(text);
        }
        displayIncomingText.text = text;
}- Whenever this coroutine is run, the web request is made to the webhook with post method.
- To send the post contents, we convert it onto byte array
- Then upload a data using new instance of
UploadHandlerand send it the byte JSON. - Next prepare a download handler.
- Next set header content. This webhook accepts
jsoncontent type. - Yield the request.
- Then check if network error occured, then set error text. Else show the returned text on log.
- Finally, set the text field of displayIncomingText to the current text.
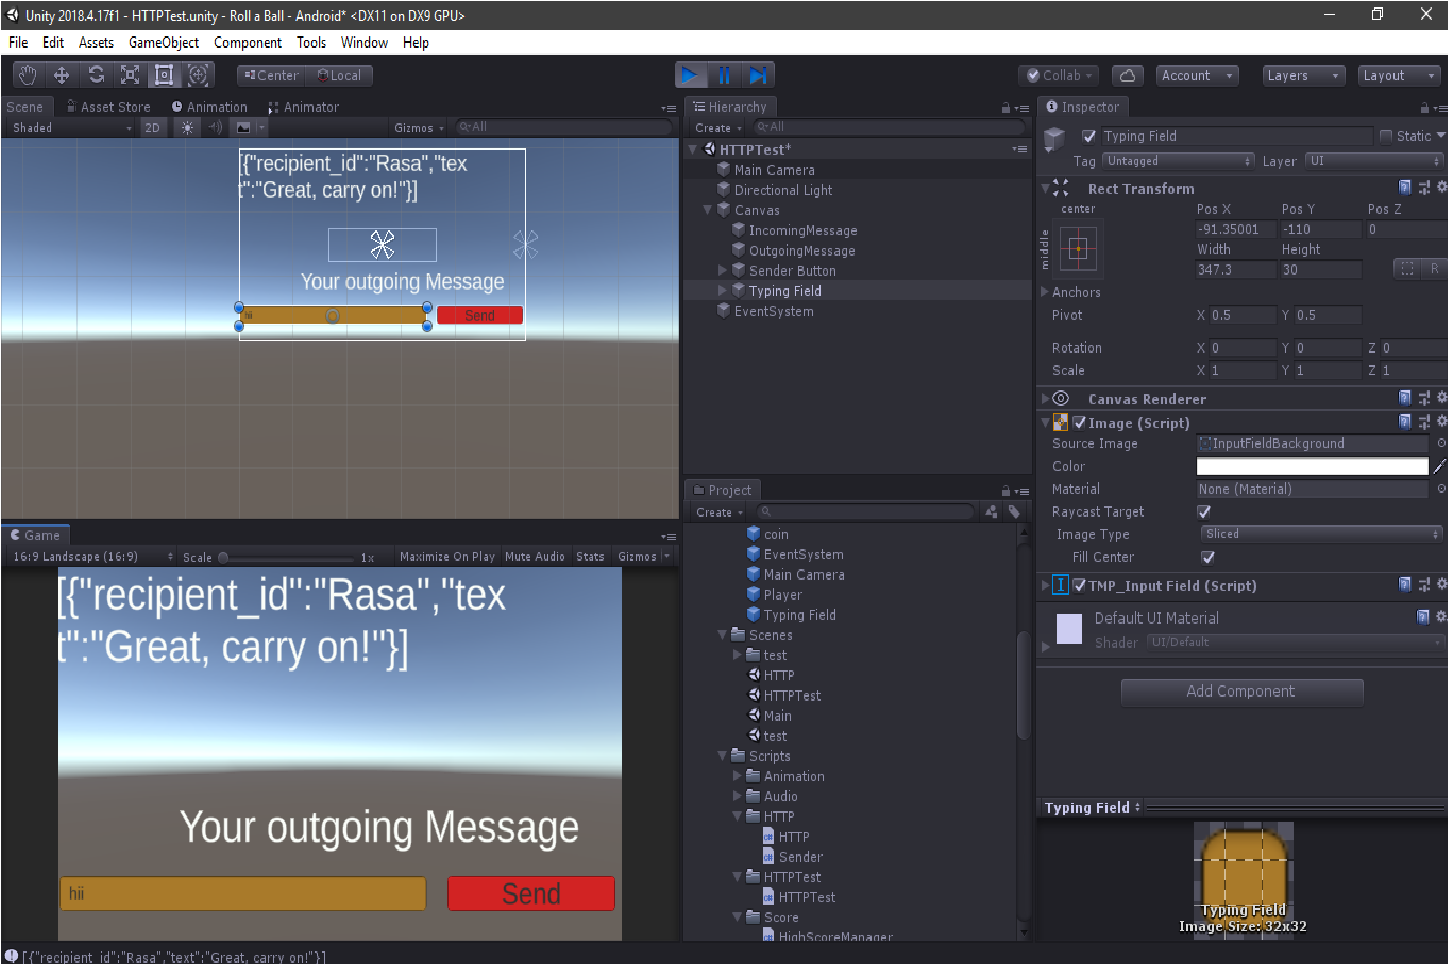
I have changed little color on the button and input field here but the focus must be on the console log and the incoming message text field. This is what RASA returned to us. Now is the overhead for us to parse this text and show only the part "Great, carry on!". Your result or response might be different than this one but only focus must be on the response. If the error is show then look over console log. Also leave a reply instead.
Parsing the incoming message
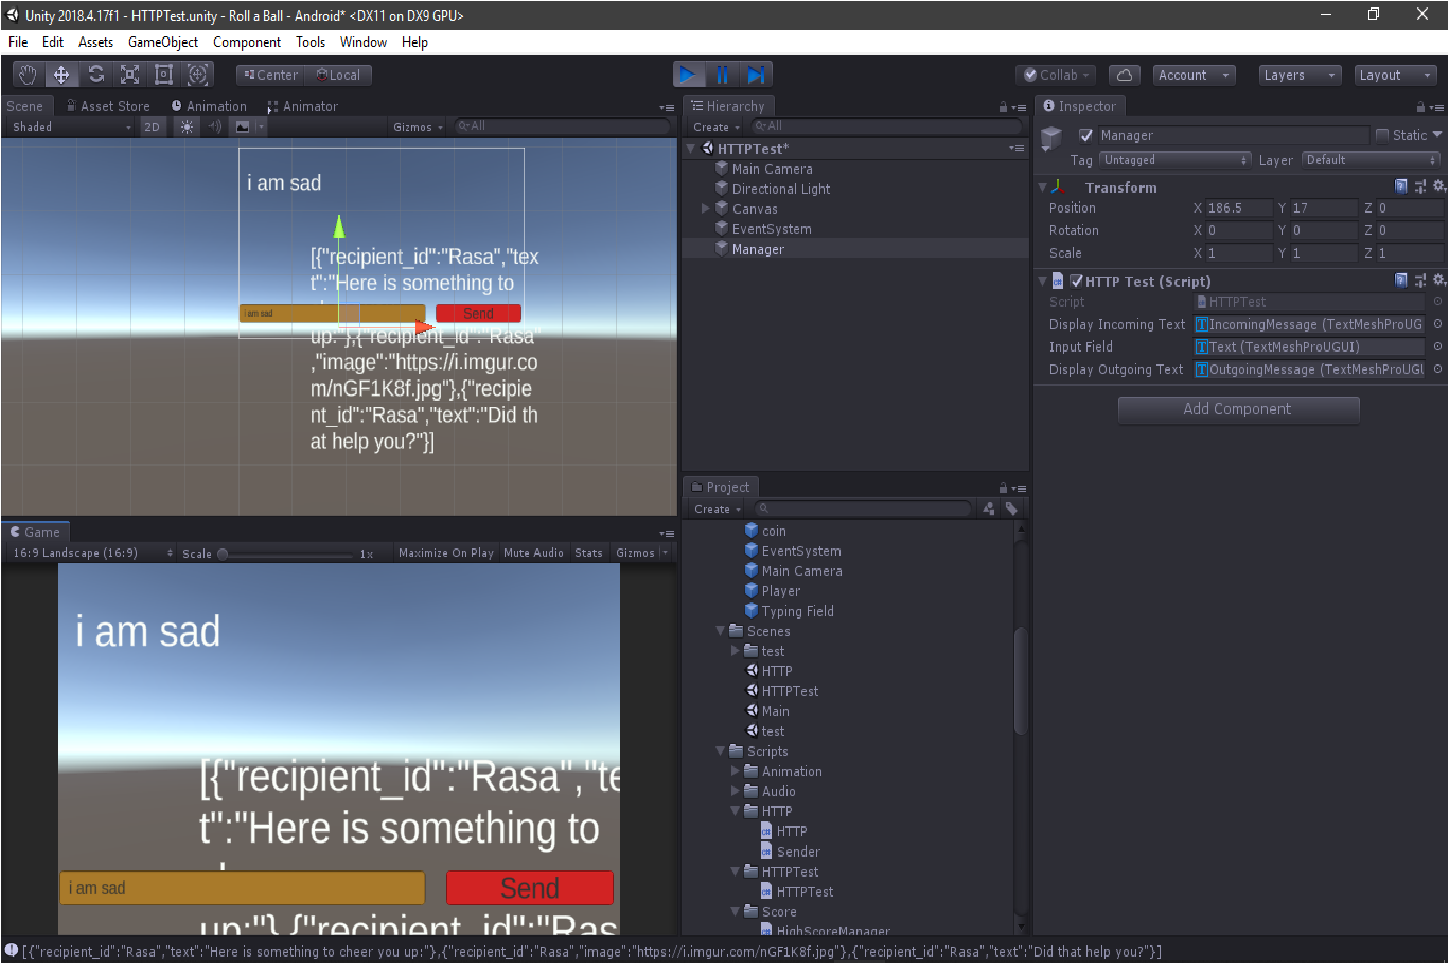
Our GUI doesn't looks great here. Outgoing message is not shown well and neither the incoming message is on well form. Lets try to improve it. Drag and make outgoing message above the incoming one. Until now we were doing many things on wrong way. Lets improve it by adding a new empty game object.
- Create an empty GameObject, name it Manager.
- Create insert an HTTPTest script on Manager
- Edit the event on button, fire the CallPostRequest of Manager's HTTPTest.
- Remove the HTTPTest Scripts from all other game objects.
- Play.
- Done.
It must be something like below.
IEnumerator PostRequest(string uri, string json)
    {
        var uwr = new UnityWebRequest(uri, "POST");
        byte[] jsonTOSend = new System.Text.UTF8Encoding().GetBytes(json);
        uwr.uploadHandler = (UploadHandler)new UploadHandlerRaw(jsonTOSend);
        uwr.downloadHandler = (DownloadHandler)new DownloadHandlerBuffer();
        uwr.SetRequestHeader("Content-Type", "application/json");
        yield return uwr.SendWebRequest();
        if (uwr.isNetworkError)
        {
            text = "Error";
        }
        else
        {
            text = uwr.downloadHandler.text;
            string ntext = "";
            string prev = "}";
            string now = ",";
            int prevInd = 1;
            int ind = 1;
            string empty = "" +
                "";
            foreach (char s in text)
            {
                if (prev == s.ToString())
                {
                    string m = text.Substring(prevInd, ind - prevInd);
                    ntext = ntext + JsonConvert.DeserializeObject<Message>(m).text;
                    Debug.Log(m);
                    prevInd = ind + 1;
                    ntext = ntext + empty;
                }
                ind = ind + 1;
            }
            int startInd = text.IndexOf("text") + 6;
            int length = text.Length - 3 - startInd;
            text = ntext;
        }
        displayIncomingText.text = text;
    }
Parsing the text string to JSON string was hard for me on C# so I manually tried to get the only part that contains the message. I did that by looking onto the response of webhook and counting where the key text, message lies. And also I deserialzed the attributes of Message. Some slicing, indexing, searching completes this operations. This came onto mind to solve this particular problem and I was stuck for hours due to this problem. So I hope someone finds a better way to do this.
Test on Android device
Now is the time for us to test it on our phone. So download the application named Unity Remote 5 and install it on phone. Open that application and follow the written instructions. That should be:-
- Edit-> Project Settings->Editor
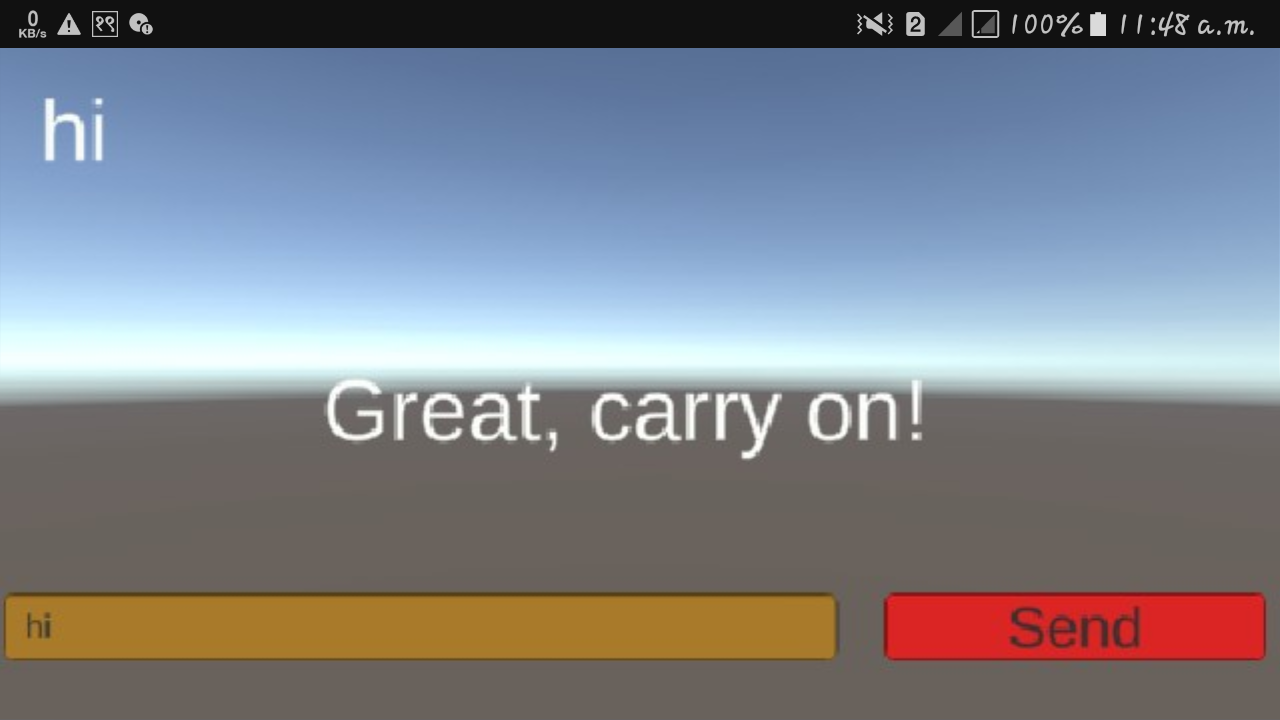
When pressing Play button on editor, now Scene must be loaded on phone. If you are testing it on phone, then it will not work for now. Because the keyboard is not shown on phone when clicking on the input field. So what I did instead was typed the message from Editor and pressed the send button from Unity Remote.
Building an APK file
If any USB Debugging enabled phone is connected then we can directly build and install apk on Android phone, just have to click on build and run. But Building an apk file first and then installing on phone can also be done. If the build finishes without any error, then it is fine else, make sure you are on internet (sometimes gradle build tools is expected to download). Build System must be internal not a gradle. But when we type and send the message, error is shown because we do not have a medium to connect with RASA server from phone. One way to connect RASA server for now is by laptop hotspot. Turning on laptop hotspot and then we have to change the URL on HTTPTest.cs file.
- Turn on hotspot on computer
- Turn on WiFi on phone
- Edit the address
Final code looks like below:-
using System.Collections;
using UnityEngine;
using UnityEngine.Networking;
using TMPro;
using System;
using Newtonsoft.Json;
[Serializable]
public class MessageSender
{
    public string sender, message;
}
public class Message
{
    public string recipient_id, text, image;
}
public class HTTPTest : MonoBehaviour
{
    private string text;
    public TextMeshProUGUI displayIncomingText;
    public TextMeshProUGUI inputField;
    public TextMeshProUGUI displayOutgoingText;
    void Start()
    {
        //displayIncomingText = GetComponent<TextMeshProUGUI>();
        //inputField = GetComponent<TextMeshProUGUI>();
        //displayOutgoingText = GetComponent<TextMeshProUGUI>();
        //Debug.Log(displayIncomingText.text);
    }
    public void CallPostRequest(string txt)
    {
        MessageSender thisMSG = new MessageSender();
        thisMSG.sender = "Rasa";
        // read from the input field here.
        thisMSG.message = inputField.text;
        displayOutgoingText.text = inputField.text;
        string json = JsonUtility.ToJson(thisMSG);
        string address = "http://localhost:5005/webhooks/rest/webhook";
        StartCoroutine(PostRequest(address, json));
    }
    IEnumerator PostRequest(string uri, string json)
    {
        var uwr = new UnityWebRequest(uri, "POST");
        byte[] jsonTOSend = new System.Text.UTF8Encoding().GetBytes(json);
        uwr.uploadHandler = (UploadHandler)new UploadHandlerRaw(jsonTOSend);
        uwr.downloadHandler = (DownloadHandler)new DownloadHandlerBuffer();
        uwr.SetRequestHeader("Content-Type", "application/json");
        yield return uwr.SendWebRequest();
        if (uwr.isNetworkError)
        {
            text = "Error";
        }
        else
        {
            text = uwr.downloadHandler.text;
            string ntext = "";
            string prev = "}";
            string now = ",";
            int prevInd = 1;
            int ind = 1;
            string empty = "" +
                "";
            foreach (char s in text)
            {
                if (prev == s.ToString())
                {
                    string m = text.Substring(prevInd, ind - prevInd);
                    ntext = ntext + JsonConvert.DeserializeObject<Message>(m).text;
                    Debug.Log(m);
                    prevInd = ind + 1;
                    ntext = ntext + empty;
                }
                ind = ind + 1;
            }
            int startInd = text.IndexOf("text") + 6;
            int length = text.Length - 3 - startInd;
            text = ntext;
        }
        displayIncomingText.text = text;
    }
}
Thank you so much for reading out. And I am still unsure that this blog has some errors. SO if you have any query about this project, please leave a comment or you can find me on Twitter as QuassarianViper.
What next?
- Building a text based game using Chatbot.
- Handling buttons, images, carousels etc.
Don't forget to check out
- Gesture Based Visually Writing System Usin OpenCv and Python
- Convolutional Neural Networks from Scratch Usin Python